When I was reading about this product, phrases such as ‘The greatest addon EVER’, or ‘The Best Aircraft Simulation addon EVER’, would appear. But then it appeared to me, these have only been put here to make people buy the product which they think is really excellent. So after all that I decided to review the product and find out what it really is like.
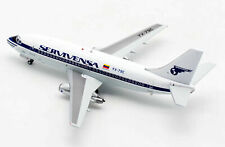
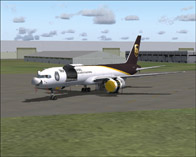
I’m sure you have all seen the Greatest Airlines 737 first version, which was very good. But the demand was so high that when FS2002 was released Flight1 and Dreamfleet the original developers were forced into making an even better version for FS2002, and that is where ‘Greatest Airlines 737-400 Special Edition’ came from!


Installation
Now the installation of this product is different from most addons. You will get an Introduction screen which you need to follow to install the product, after that you will arrive back at the screen again to install the Aircraft Templates. Without installing these you will only find one airline in the aircraft directory and that is BMI. Installing the templates takes a little time but is worth it. You select which airline and their livery that you want to install, and then add it to your aircraft Directory. After FS 2002 has started you need to go to the Select Aircraft and you will find your new addon in the section ‘Flight1 and Dreamfleet’. When I first looked I thought it may have been in the Boeing 737 directory, but I was wrong, it makes its own directory. Possibly the reason for this is the amount of airline liveries that could be there. This package includes over 80 airline liveries spanning from Aeroflot to Deutsche BA, and even if your favourite is not in here you can download over 100 more from the net.
Panel
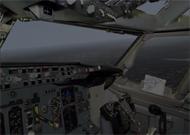
Now when the aircraft is first loaded up the panel doesn’t look a lot different to the default 737, OK you can see a few differences, improvements in textures and dials. But until I found how to switch to different panels that is when I really saw the in-depth detail in this aircraft. At the bottom left of your screen a little rectangle box is available with a view direction indicator whereupon when you click an arrow it will give you a view in that direction, we’ll come back to this. Anyway there are a total of 12 little switches, these are explained below.
The first switch will basically turn on and off the visible yoke. The second switch is the Throttle Quadrant, this is a lot different to the default in FS, it includes a light when the parking brake is set, a better view of the auto-throttles, then the flaps, now when you decrease or increase these flaps each increment a click noise will be heard following by the number (Flaps 15 Set). Spoilers are basically the same apart from as you arm or de-arm the spoilers a light will go on or off in the cockpit relating to how the spoilers have been set (On – Light On). That’s basically it for the throttle quadrant a few other little features such as Stab – Trim indicators but sadly don’t work, and the fuel cut-off switches have been made so they come down the right height unlike FS. We now move onto the Gear Panel, although on FS this is on the Main Panel it wont fit on this very detailed panel, anyway on the Gear Panel there is a very realistic looking gear lever that works when you press it (Up, Down, Off) with relating lights, Flap indicator which is roughly the same as in FS, an auto-brake with the same clicking action as the flaps.
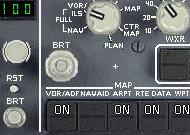
Now the newer items, there is an Anti-Skid button, not to sure if that actually works though, haven’t tried it, and what looks like to me a Hydraulics gauge which is just for show. Now that’s the gear panel finished we now start getting more detailed. Next is the radio stack, which includes a total of 6 working radios! Then we have a GPWS (Ground Proximity Warning System) which will work, and can be tested. Followed by a very detailed ILS panel, that works when the right switches are on.
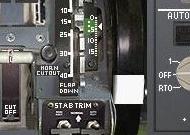
Then we are given an Intercom Panel, which you can switch different switches on and off for the radio to go to different places (Cabin, Ground etc…). Left we have a rudder trim indicator. Below we are given a flight controls panel, which includes Rudder and Aileron indicators. Bottom row we are first given a Flood Light and Panel Light switch which allows you to either turn the light brightness up or down, for either the Throttle Quadrant or the Centre Console. Then finally a Stabilizer trim button and a Cabin door sign which tells you if it is locked or unlocked. Well that’s the radio panel complete next is the Overhead panel which has the most detail, wish me luck!
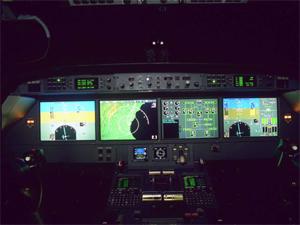
The overhead panel is the most detailed panel of them all. We will start at the top left and work our way down, so the top left we have 4 lights, this is the Panel Mode Gauge, to select when you’re either at the Gate, Taxi, Last or Off. Next to these is the callout switch which in real life operates along side these, but sadly not in FS. Below this are the Flight Control Switches, these few switches allow you to manually move the flaps or spoilers in-case of hydraulic failures. And below that the yaw damper switch with working light. Below that we are given a small grey panel with 3 small switches, these are the NAV Switches, took me a while to find that out. Anyway below that you’ll find a very complicated fuel panel with a total of 6 buttons and 12 lights and dials. Back up to the top and left of the Panel Mode switches we’ll find the AC/DC Metering Panel; basically this provides power for the whole aircraft, whether in the Galley or Ground Power.
Next is a Generator Drive & Standby Power panel, which if you don’t know what that means from the words, it basically provides standby power. Below that is another ground power panel but with this time the most important Ground Power switch, and a few ammeter dials. Now sometimes in mid-flight or taxiing you might loose the power, and wonder why, well I have, and the next panel I have found to be one main reason why this happens. The APU panel, with lots of switches, dials and lights, if you switch a button at the wrong time, it will turn off all the aircrafts power. So be careful! Back up to the top and now next to the AC/DC Metering Panel we’ll find the Overhead panel light switches, always useful at night.
Below that we get even more complicated with the Equipment cooling and Emergency lights, not to sure if those work. Next probably my favourite is the Seatbelt and No Smoking switches, with working sounds, very nice. Then we have a Attend switch, now this is very good, once pressed a few seconds later a voice of a flight attendant enters the cockpit and the captain asks for a cup of coffee. Then we have another switch saying Ground call, which once pressed sounds like a horn in the nose wheel to alert the ground crew. Below that we are given a windshield wiper and rain repellent switches, I know the windshield wipers work but can’t be sure about the rain repellent. Back to the top again, we’ll now find our window and Pitot heat switches, with working lights. Below is the engine and wing anti-ice, followed by Hydraulic pump switches, which you need to know how to work otherwise an annoying warning light will be on throughout the flight.
Below is a cockpit voice recorder which is testable. Next is a panel offering only very detailed pressurisation gauges. Now guess where we are, back at the top again, now with Leading Edge Device position gauges, not sure if they work either. Next is the Cabin and Cockpit temperature controls, these can be very useful. Next are the Air Conditioning & Bleed air controls, I’m still unsure on how to work those.
And finally we find our selves with Pressurisation Controls. Now that is the top half, below that is the engine and light switches. Left we have our external light switches, followed by the all important APU start switch, followed by the Engine start switches and finally some more External lights. All the above is an excellent layout with easy readable switches, with working lights, sounds and movements. Totally Excellent!
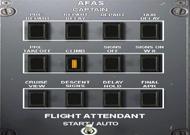
Now the hard work is over we’ll move to the next panel and that is the AFAS panel, which basically is the Captain giving out the flight calls to the passengers and crew, you have 12 Switches that you can press to make the captain talk, from Pre-Depart to Climb to Cruise View to Delay Hold. All with at least 20seconds of speech! Then a little switch below is the Flight Attendant switch, which is basically the same but she will do it automatically.
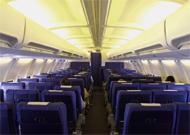
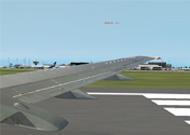
Well that is roughly it for main switch panels the next panel along is the default GPS, then we are given the Galley view, which you see the cabin, lit up with a few people sitting down, very, very nice to look at when in mid flight, a bonus is you can also see out the windows. Then we see we have either a left or right wing view, or a right wing view as if we were looking out the window from our seat. All this is very clever as when you turn the aircraft, the wings will turn when you are looking out over the wing. But sadly you can’t see the flaps and spoilers work or move.
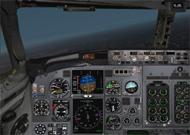
Well that is it for panels, I will quickly give you a run over the main panel but as I said above it is a lot like the default. Anyway down the left side we see the airspeed indicator, Marker lights with Marker lighting switch, clock, radio distance indicator, and a new Auto Rudder switch. Then we move to the more real looking EADI and EHSI. Above those we have a working Master Caution Switch and Master Caution Annunciator Panel. Then we have another good thing, the Altitude alert indicator that if you are going too low it will tell you verbally. Next to that is the Autopilot Annunciator telling you things what are happening with the AP. Followed by the Altimeter, VSI, and the standby Altimeter and airspeed indicators. Well that’s the left of the panel just the right left.
On the right we see a Panel Lighting switch that you can switch to different angles that will either light the panel brighter or dimmer this is very effective! Then we have a Spoiler warning light, Fuel Quantity switches and Fuel Quantity test switches. Followed by the normal Engine Gauges. But now we move up to the Glare shield, a little different to the one in FS2002, from first sight you see it is a lot more detailed and much better lit. It contains the same switches as the default but with a few others such as, ‘VOR LOC’ and ‘N1’. The overall design of the glare shield is much better, from lighting to digital numbers. It also contains the 4 main autopilot engage switches. The panel is much better designed, lightened, and overall better. Looking around with the hat switch on my joystick at the different views in the cockpit, from top left to bottom right all angles have a clear picture of what the real cockpit is like, but makes you feel your there.
Sound
Well that’s the panel done we move on now to the Sound, this 737 has been completely revamped in the sound area. The sound from this aircraft compared to the default 737 is remarkable; from taxi sound to the cruise sound everything has been totally changed. After flying in a 737 many times you get used to its sound, and I can safely say that this is the nearest you will get.
Textures
When downloading freeware aircraft or buying cheap addons, the textures are not always perfect. But this aircraft is something else; every airlines texture has been painted to every detail. Every emblem on the real world plane has been put on this. See through windows, so you will see the sun glisten through, extremely realistic night textures. I have never reviewed or owned a plane addon before that the textures have been this good.
Model
Again this aircraft is superb in its overall model, every moving part in real life has been added to this, engine blades, flaps, spoilers, thrust reversers, wheels, lights, slats, are just a few that are there. Each item moves smoothly, just as in real life. The lights, rotating beacon, landing lights, wheel well lights have all been added and are able to be seen in both night and day. Totally Realistic.
Other Items
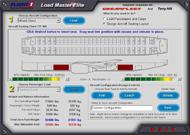
And you thought that was it, well no DreamFleet and Flight1 have added Load Master Elite, this product enables you the pilot to make adjustments of the aircraft weight, depending on how many seats you wish to have or how much cargo capacity. You can choose Business class seats, to have a business jet or normal aircraft seats to fly passengers on their holidays.
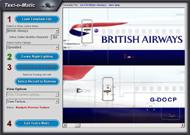
Text-o-matic, yet another item added by the developers. This enables you to add the paint schemes you wish. Only want a few select them here. You also then select the aircrafts callsign for ATC purposes in FS2002, but if you are using this with FS2000 don’t worry the registration can still be viewed on the fuselage.
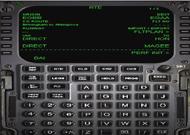
The most important item onboard a real 737, the FMC or Flight Management Computer. This is the most important computer onboard the aircraft for navigational use. And guess what, it has even been added into this addon! It has been designed to resemble the real FMC, every button works, every page is correct. But most of all it interacts with FS and allows you to plan your flight on it, just like real life! This magnificent product can be sometimes hard to work, so there have been 5 tutorials added so your flight can be easy and enjoyable.
They have also added a TCAS system to make sure you are a safe distance away from any traffic; sadly this is only available in FS2002 as FS2000 doesn’t have any AI traffic.
FREE VIDEO!
If all that is not enough DreamFleet and Flight1 have also added a free 90minute VHS video! On its own this is worth over £20. This video is based on Go Airlines, who received a brand new 737-300; we take this brand new aircraft on its first passenger flight from London Stansted to Lisbon. We meet out pilots Captain John Mahon and First Officer Joe Whoilan, who welcome us aboard and make us feel comfortable in the cockpit as we watch this flight from many different camera angles and hear crystal clear audio of both ATC and pilot communication. We are then given a full demonstration of the cockpit, every button and item is discussed to you, describing what it is used for and how it works. After watching the landing procedures take place, viewing the charts, we watch the 737 land from both inside the cockpit and outside at the airfield. We then find our selves on the ground at Lisbon, as the Captain takes us on a walk around as we see the brand new 737 after its first passenger flight. We then join the two pilots on the return trip back to Stansted as the Captain this time shows us in detail the FMC and how it works, so will you need the tutorials after this?
Remember all this is viewed from both inside the cockpit with many different camera angles, and even better we get to view the landings and takeoffs from outside as well, all this while listening to crystal clear ATC. What more do you want.
Documentation
Inside the box we have a full ‘Pilots Manual’ which discusses every problem you may have, including how to work the autopilot, how to find the answers to your problems and much more. Including full designs of all the panels describing in much more detail than I have. You are then given a flight with Marco Arranz, a 737 pilot with a Major European airline and also a member of the team who designed this product. He will take you through a full flight and checklists, so be ready to follow as he tells you what to do.
Searching the CD I found 18 FULL documents on how to fly the 737 professionally. All these are designed on Acrobat Reader with full presentations and drawings, describing each part of the plane.
With this amount of documentation, any problem you may encounter you will be able to find the answer somewhere in there.
Conclusion!!
If you want your Flight Simulator to live up to the words ‘As Real As It Gets’ then you need this product 100%. The default 737 is OK, but compared to this it is nothing. All this for a small price of £34.99 or 55euros (approx) to improve your simulation is well worth it. With a FREE Video, Full Documentation and;
The Most Detailed Aircraft Addon EVER
You’ll be sure to have as much fun as being a real pilot!
A Full 100% Marks for this addon. There is no way it can be improved. This is
‘As Real As It Gets!’
FSPlanet Rating 5/5